Brightening My Work Home
Posted: September 26, 2012 Filed under: my crafts | Tags: cube, decor, diy, home away from home, office space, work Leave a commentAs many of you know I transitioned back from Flagstaff to Buffalo, NY this past spring. When transitioning back, I was unimpressed with the gray skies and I missed the sunshine from where I worked in Flagstaff. As we spend 40+ hours a week at work, I thought I should enjoy being there. While I’m on the road occasionally, or out on the testing floor, I still spend a majority of my time in my cube.
I did a quick search in google and was able to find the following inspiration ideas!
 Jungle themed – I liked how the bright bold colors popped
and how professional the space still is. Read the rest of this entry »
My Very First Pinterest Project
Posted: September 23, 2012 Filed under: my crafts, our home | Tags: diy, elle sweeden, home depot, pallet, pinterest, space saving, wall hanging Leave a commentTrue to the inner crafter in me, I fell hard for Pinterest. You know the kind of falling head over heels in love with it that it borders on obsession. Yes that kind. Anyways this brings me to the story of the completion of my very first Pinterest project.
Being newly engaged I was heartbroken when my fiance had to relocate 3000 miles back to NY from the beautiful Flagstaff, Arizona where we had learned to call home. And as a true engineer anticipating the move, we had to downgrade from our 1800 sq ft town home, to an 800 sq ft apartment. (me=sad face).
Not that we Greg let me fill an 1800 sq ft apartment but moving 2 people into an 800 sq ft apartment, plus a room-mate was going to be a challenge. It was an especially tight space, for our big furniture, big tv, big table, big bed, and Guinness. All these things fit well in our first place, but not so great here. Anyways, we quickly found out how awkward and unusable the space became once all of our stuff was CRAMMED into the tiny apartment. There was no place to put our shoes, hang our coats, and keep all the necessities for winter and flagstaff (hat, gloves, camelback, dog leashes.. etc.)
My Tada Moment – Insert PINTEREST. I found the below Pin, and was in heaven! This was cool, decorative way to keep things off of the floor and I could build that by myself out of an old pallet.

Craigslist Kitchen Cabinets
Posted: September 16, 2012 Filed under: our craigslist finds, our home, our kitchen | Tags: cabinets, diy, diy kitchen, kitchen, kitchen on the cheap, kitchen remodel, our craigslist finds, woodmode 6 CommentsSo if you’re like me, when purchasing a home there is always one thing you wanted to immediately to change. (This probably came from watching too much HGTV… at least Greg likes to think so) However for us it was the kitchen. Kitchen’s are a big project, but as overly ambitious first time home buyers we were excited and ready. And lucky for us the original 1950’s kitchen had already been updated with new kitchenaid gallery stainless steel appliances <;2 years ago [thank you previous home owners]. Although now after living in it, it just screams the need for more functionality, casual entertaining space, and a complete remodel!


While we’re always interested in saving money by DIY, we still really wanted to add value to our home that we could take to the bank in the future. Has anyone seen the cheap, poorly done DIY/Flipped homes? You know the ones that immediately scream I did this myself to save money or I watched a lot of Flipped and think that makes me a pro with the jagged cuts and unfinished rooms. Or maybe you’re like us and have watched a ton of the HGTV shows that have a $50,000 remodel and sell their house for $100,000 more. What a Deal, Right? However I hate to break it to you but those shows are filmed in Toronto, Canada eh?and depending on where you are in the US this recouped cost typically never matches those figures.
Ikea Slipcovering a Non-Ikea Sofa
Posted: September 14, 2012 Filed under: our home | Tags: Couch Cover, Guinness, Home Layout, Ikea, Project Failure, Sun Room, White Sofa Leave a commentAs college students who moved every 3 months for 5 years, it’s been hard for us to rationalize having items that didn’t fit in our car for [practical] reasons. One of our good friends even decided to give up on belongings all together and start an adventure living in a 1988 Lindy motor home (check him out here his story is awesome).
So one of our first projects in our first home were these jungle floral couches in our sun room. [Donated to our empty house from one of our amazing family members] We love hanging out in here, the room gets great natural light, a nice breeze and at night it has this dim mood lighting relaxing feel to it. We also loved these sofa’s, as in the evening Greg and I each would lay on a couch and tell one another about our day. So while they had great function they didn’t quite match our style ideas for the house (even though as a friend pointed out they match the original wall color in the room YUCK).

Our lovely solid pieces of furniture
So I set-off on a mission on how to re purpose these loveseats on a low low budget. I looked at slip covers from various stores, but they were all too big, were made for big round arms, or were hundreds of dollars a piece [boo]. But I stumbled upon the Karlstad loveseat from Ikea, and it dawned on me that my jungle floral couches are an almost match. Ikea has slipcovers for $39 – $200+. While I loved the $200 ones my budget just didn’t stretch that far for two slipcovers. So for $39 we invested in the white covers, and $39 well that was the cheapest cover I’ve found.

Karlstad Love Seat Cover in White from Ikea – $39.00
::screech:: Hold the Horses! A WHITE Sofa’s? Really?
I know, I know, White sofa in a sunroom and with a black-haired dog YIKES! So I did my research and found multiple blogs [here and here and here] of mom’s with kids, and after 2+ years still love their white sofas. I even debated dying them like The Handmade House. However “they” say to wash every week, and with an occasional bleaching as needed, they hold up beyond anyone’s initial expectations. With that we were sold!
At first glance when the slipcovers arrived it looked like a complete failure. It looked like a failed project and these were going to end up on Ebay. The cushion covers are too big, and the arms are slightly odd shaped comparatively. But Greg insisted I keep trying, and with a little bit of imagination I started in.
First, it required removal of the sofa skirt. Using my big strong arm muscle power, a pair of pliers, and my lovely Fiskars utility scissors, the skirt border came apart with removal with what felt like 100,000 staples.
And Ta da! Look at the beauty of a sofa that was unvailed just by removing the sofa skirt!

The next step involved a little bit of pushing and pulling with the Ikea slipcover. Our jungle sofa isn’t an exact dimensional match, but is so close… Therefore a seem ripper came in handy to remove the seems along the edges of the cover that typically fit the corners of the sofa.

Then came the fun part, there was a lot of tucking, pulling and sticking of of velcro hook tape and waiting 24 hours. So far I’ve only velcro attached the front of the sofa’s everything else is hanging freely temporarily. I would like to say at some point I will seem up a good fit, but as life gets in the way I’m not sure when I’ll get around to it. The cushions on our jungle sofa were also a lot smaller then the Karlstad, so for now they’re just folded over and tucked underthe cushions
Overall they have that kind of wrinkled Ikea sofa look (as there is slot of tucking) but so far I’m just in love with the transformation. Ta-Da! Our Completed Sofa!

Our Finished Sofa – Me= So Proud
The room in the daylight feels more polished and finished (until we can paint & decorate).
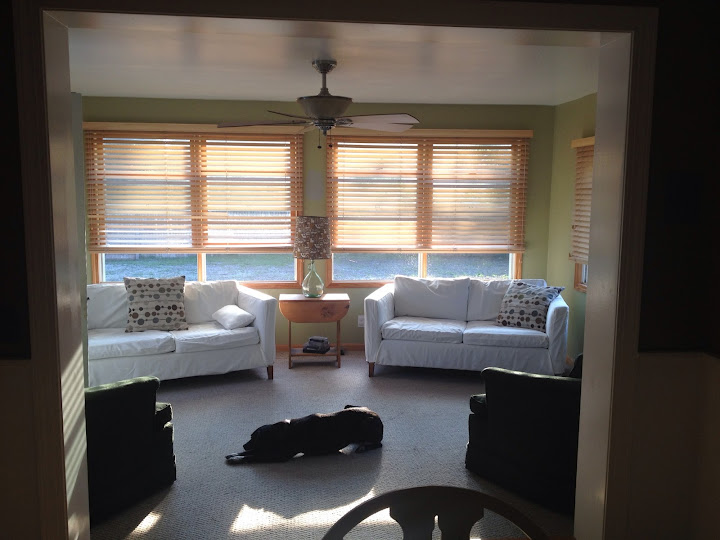
View of Sunroom For Now
Check back soon for more updates to the sunroom!
What do you think of our new sofa covers, anyone else have a better idea for <;$80 for two?
Cheez it’s (The GF Kind)
Posted: September 11, 2012 Filed under: our food | Tags: cheez it, food, gf, gluten free, recipie, snack Leave a commentYes sometimes Greg calls me an amazing fiancé… and this is one of those circumstances.
Okay, okay while he did say that, I can’ t take all the credit, this recipe was so easy that I would hardly put it at me being amazing. More of Greg loves Cheez It’s so much he just couldn’t contain his excitement. And with his weird allergies, this recipe was Greg friendly.
My recipe is an adaption from the one found here.
1 cup of Bob’s Red Mill GF All Purpose Flour
1 cup of Grated Sharp Cheddar Cheese
4-5 Tablespoons of Butter
Splash of Cayenne Pepper
5 Tablespoon of ice cold water
Steps:
- In a food processor add all the ingredients but the water. Note: As I only have one of the little black & decker food processors I can only fit 1/2 cup of the cheese and 1/2 cup of the flour. So I do mine in batches, and then just mix together.
- Now gradually add 5 tablespoons of cold water. (I use my hands) Until the powder sticks together in a ball for consistency.
- [optional step] if the ball is too warm, put in the fridge or freezer until its at a good roll out temperature
- Then roll out onto parchment or wax paper, thinner the better.
- Roll lines into the dough to make the squares
- [optional] poke holes (i used a chopstick) & dash with salt

- Bake at 350 deg for 15-20+ min depending on thickness.
I had to cut the edges off and bake gradually - Re-Roll using a pizza cutter to brake apart and ENJOY!

Greg has now been asking me to make these every night, half for an afternoon snack, and half for lunch the next day. They’re easy to make, great tasting and the best part is Gluten-Free.

