A Stripe of a Monday
Posted: April 1, 2013 Filed under: my crafts, our home | Tags: diy, horizontal stripes, living room wall, painting stripes, stripes, wall stripes Leave a commentIt was one of those rough Mondays… the kind where you want to pull the covers back over your head, the cup of coffee doesn’t help get you going and nothing during the day seems to go right. While I couldn’t be more looking forward to Friday.. for me accomplishing a DIY project can turn my whole day/night around.

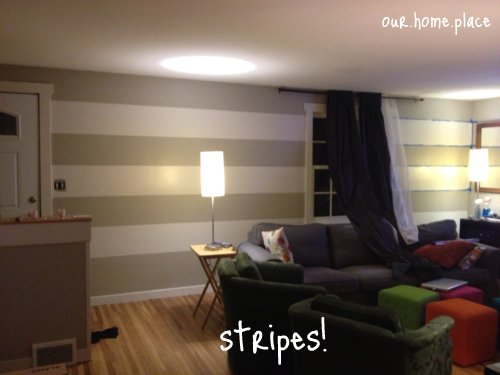
Last Monday I came home and looked at my living room, it was bright outside, but so grr… well gray on the inside. And while gray is what I wanted, but without artwork it was just kind of blah…

what are those colorful cubes in the corner.. we’ll get to that another day..
I read a few blogs that said putting stripes on a wall took less than 3 hours.. Well I had 3 hours to burn before bed so off I went. I combined two tutorials to get my end result.
First I followed the how-to guide from the unskinnyboppy.
1. Using what your momma gave you…
A free project requires getting creative.. so I used my off white trim paint that we had left over from the trim work. Yes it was satin/semi-gloss paint.. but not having to worry about it meeting at the trims really excited me.. I’d recommend going with a matte in the future.. but again using what your momma gave ya..
2. Lucky number 7–
I like Beth wanted 3 wide strips across my wall, I took my total wall height which is only around 85″ (yup old home=short ceilings). So 85/7 = ~12″ apart. to make 3 defined stripes across the wall. And for you math geeks, the extra .45802 can be found at the bottom in about an extra 1″ (don’t notice.. Great! We don’t either!)
3. Tape! Those! Lines! (with as much excitement as “Move That Bus”)-
This is where I followed thehouseofsmiths‘ technique. I used a long level, pencil, a handy dandy measuring tape and a ladder or Greg when the long measuring tape and pencil juggling just didn’t work with 2 hands.
As Beth recommended I always measured down my chosen 12″ from the ceiling and made a pencil mark. I penciled across with the level as a straight edge and then.. Taped! Those! Lines!- I used my insurance card to smooth the tape across as I went to get a crisp edge.
ps. remember to tape on the right side of the line.. and if you mess up the best part is you can rip up and try again. (I only did this once or twice… it got dark quick..)

4. Watching (or in this case not watching) Paint Dry
I painted one coat on each of my 3 stripes, and then went back and did a second coat after about 30 minutes (while I taped the other side). After the second coat you want to “Get that Tape Off” (okay, not nearly as catchy?) but the key to crisp paint lines is taking the paint off right away.
After comparison testing painters tape and working with the tape manufacturers its their #1 recommendation. Longer the tape is on the surface the more prone it is to drips, blips and bleed through… seriously its 3rd party tested.
5. Admire Your Handy work
After about 3 hours of work, I cleaned up and then was able to admire my handy work.
I admired it right away…
And again after I cleaned up:
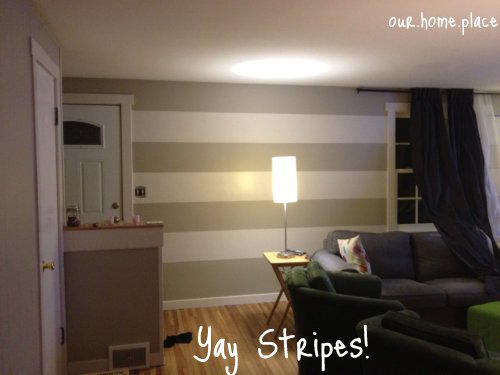
And again the next day..
 Yay Stripes!!!.. okay so I was a little excited.. after a week its worn off.. but I made Greg and my poor brother look at least every day… haha
I’m one of those stubborn I’d rather finish it and feel the accomplishment right away then have a project drag out.. Any one else feel like that after a project? Or have a week day inspiration to tackle a quick project? Did it make you feel better or was it a disaster?

